How boots are made
The Manufacturing
Process
Cutting out the pieces
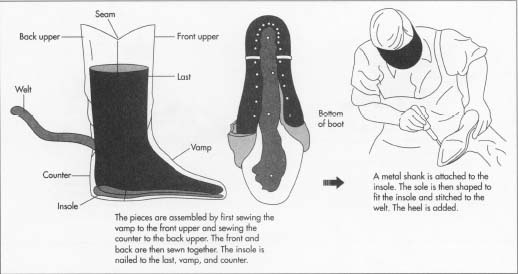
- 1 Once the leather has been selected, the process of making the top part of the boot begins by cutting out the individual pieces. This might be done by hand in custom shops, but in factories it is done by metal dies, which work like cookie cutters. The top of a boot consists of three parts: the part that covers the top of the foot, the part that encloses the back of the heel, and the part that fits around the bottom of the shins. These are called, respectively, the vamp, the counter, and the uppers. The vamp is like the top and sides of an ordinary man's shoe, but it is one piece instead of several, without lace holes and a separate tongue. The counter covers what the vamp does not. The uppers are cut in two pieces, one for the front and one for the back, designed to join each other at the sides. At this stage, the lining for the inside of each of these pieces is cut out and then glued into place. The lining is particularly important for boots made of fragile skins such as snake or eel, for the leather backing will provide most of the strength.
Decorating the pieces
- 2 If the boot is to have any kind of stitched decoration—whether a simple
pattern, or an elaborate picture such as a yellow rose, an oil derrick, or the state of Texas—this is done before the pieces are assembled. In custom shops, the design is sketched on a paper pattern or stencil and then outlined with a series of small holes. This stencil is laid over each piece and then sprinkled with a marking agent such as white powder, so the design can be followed by someone operating a sewing machine. Factories tend to use computerized sewing machines for this task, with preprogrammed designs, so marking the leather isn't necessary. Any additional colors the design requires are dyed into the leather at this stage.

Assembling the top of the boot
- 3 The boot is initially assembled in two halves, front and back. The vamp, the part that covers the top and sides of the foot, is sewn to the front upper; the counter, the part that covers the heel, is sewn to the back upper. Excess leather around the stitching is then trimmed off. A long strip of leather called the welt is then attached to the back of the counter and left hanging there. The welt will be used at a later stage to attach the top of the boot to the sole.
- 4 The front and back halves of the boot are then glued and sewn together. These seams are made first on the inside, so the boot initially takes shape inside out, like a shirt. Leather is, however, harder to work than cotton, and once the seams are made the top of the boot must be soaked in water until the leather is flexible enough to be turned right outside out again. At the end of this stage, the top part of the boot is complete; in a custom shop, the work of a top man would now be done.
Attaching the insole
- 5 The first step in building the bottom of the boot is attaching the insole to the vamp and the counter. The insole, in any shoe or boot, is the part you see when looking down inside it; it often bears the imprint of the maker's name. A key component in this part of the process is the last. The last is basically a model of a foot—an anatomically accurate version of a shoetree—which is left inside the boot during the rest of the manufacturing process. In a factory, lasts are standard sizes and generally made of molded plastic. In custom shops, they are made of hardwood and adjusted to the precise shape of an individual's foot. The workshop of these bootmakers may contain
thousands of lasts, hanging from the walls and ceilings, available for the customers they expect to reorder.

- 6 The insole is first tacked to the last. Then the vamp and the counter are nailed over the insole into the last—first in front, at the toe, and then working around on both sides towards the back. At this point, a stiff piece of leather is inserted at the front of the vamp to reinforce the boot at the toe. The welt, which has been hanging on the back of the counter since the top was first made, is then sewn onto the vamp and the insole. The boot is now almost complete, lacking only a heel and a sole.
Assembling the sole
- 7 Because the welt now binds together the insole, the vamp, and the counter, the nails that tacked the leather to the last are no longer necessary. The nails are removed, but the last remains inside the boot until it is finished. A metal shank is then attached to the insole, to reinforce the high arch; it is held in place by a piece of leather. The sole is shaped to fit the insole and then stitched to the welt. The heel is then nailed on, and then both the heel and the sole are shaped by sanding.
Finishing process
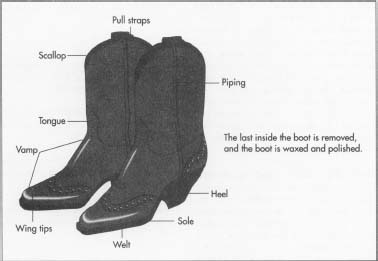
- 8 The finishing process gives the boot its final appearance. The last is removed and a boot tree is used to make fine adjustments in the shape of the boot. Seams are trimmed and stray threads cut short. Final dyes are applied, if necessary, and then the boot is waxed and polished. The boots are checked for quality at this stage, though the standards of quality control vary between factories and custom shops. In a custom shop, how the boot fits an individual customer will distinguish an approved product from one that may need to be reworked or rejected. But with both kinds of manufacturing, the number of stitches per inch is important, as is the quality of the leather, and the strength of the welt.
Read more: http://www.madehow.com/Volume-2/Cowboy-Boots.html#ixzz5oeiqDGsz


